
Table of Contents
Firmware for the JGAurora Z-603S
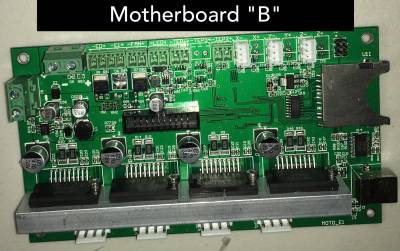
This printer had a motherboard change mid way in 2016, so there are at least TWO different motherboards. Click here to see some photos of these motherboards. Of the two versions that are known to exist, I am referring to the one as “motherboard A”, and the other as “motherboard B”. Type A has separate heat sinks over the stepper drivers, type B has one long continuous heat sink.
Download Firmware
Please click the photo below that matches your motherboard to download the correct firmware for your Z-603S.
Each link contains both the OEM factory firmware, and the custom community firmware for these printers.
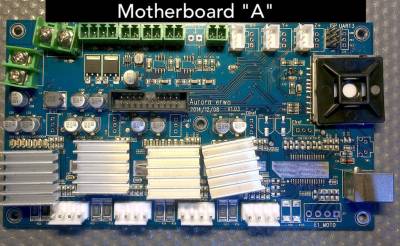
PLEASE NOTE: the type A can come in green as well. Mine was an older one, which was why it was blue.
To browse the JGAurora Z-603S firmware directory, click here.
Install Custom Firmware
- Download and install arduino IDE software from https://www.arduino.cc/en/Main/Software
- Close all other programs that talk to the serial port, like Cura.
- Unzip the firmware download, and open the “Marlin.ino” file in the Arduino IDE. Make sure the folder the firmware files are all located in is “Marlin” with a capital M, and make sure the selected tab in the Arduino IDE says “Marlin” and not something like “conditionals.h”.
- Plug in Z-603S to your computer via USB cable
- In the Arduino IDE, under the Tools menu, set:
- – Board to “Arduino/Genuino Mega or Mega 2560”
- – Processor to “Atmega 2560 (Mega 2560)”
- – COM Port set to your 3D printer’s com port: To find your COM port, unplug the printer, and see which com ports are currently listed. Plug the printer USB cable in, and see if any new COM ports appear. Those will likely be your printer. If you can’t find the right com port, or your device is not detected, you may need to install drivers for the FTDI serial to USB interface chip in the printer
- Install the u8glib library, using the library manager found under the menu “Sketch → Include Library → Manage Libraries”
- In the Arduino software, choose upload, under the sketch menu.
- Wait for the firmware to finish uploading.
- Celebrate! You did it!

Install Factory Firmware
For Mac: Download HexUploader For PC: Download XLoader
- Plug in printer via USB
- Install FTDI drivers, if neccesary.
- Open flashing program, and select HEX file.
- Choose COM/serial port that matches your printer
- Choose “Upload”
- Wait! Don't touch anything!
- Celebrate! You did it!
Custom Community Firmware Version History
17th Feb 2018
- Initial public release, based on latest 1.1.X (1.1.8) build.
- EEPROM off
- Bed levelling probe support disabled.
