Table of Contents
Getting Started: Printing Settings
Slicer Setup
A slicer is what takes your 3D file (STL, OBJ), and turns it into a series of movement commands (G-Code) that the printer's motherboard knows how to execute. The JGAurora A5/A3S come with a piece of software called JGCreat. This is a rebadged version of Cura from around a year ago.
We recommend you download the latest version of Cura instead of using JGCreat.
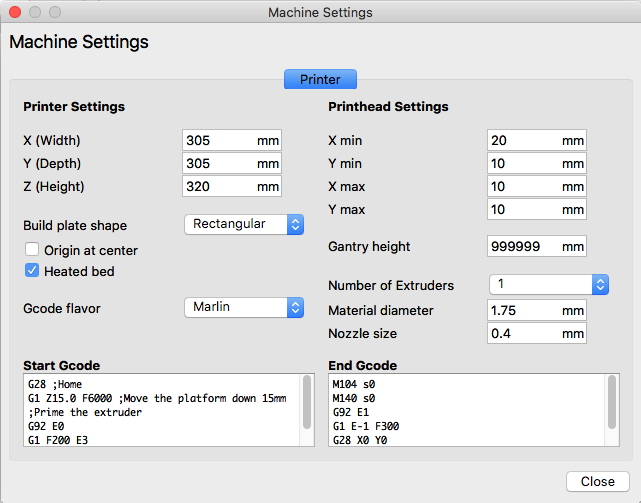
You can setup a current version of Cura by selecting the “custom machine” option, and entering the following machine settings, as seen here:
 Source: here.
Copying settings from JGCreat to Cura
If you want to use Cura, but keep the JGCreat printing profiles, then follow the following steps to copy across the profiles:
- Make sure both JGCreat and latest version of Cura are installed, but that both are closed and not running.
- In File Explorer, navigate to C:\Program Files\JGcreat 2.5.0\resources\definitions
- Copy all the files in there. These files all end in “.json”.
- In File Explorer navigate to C:\Program Files\Ultimaker Cura 3.1\resources\definitions
- Paste the copied files.
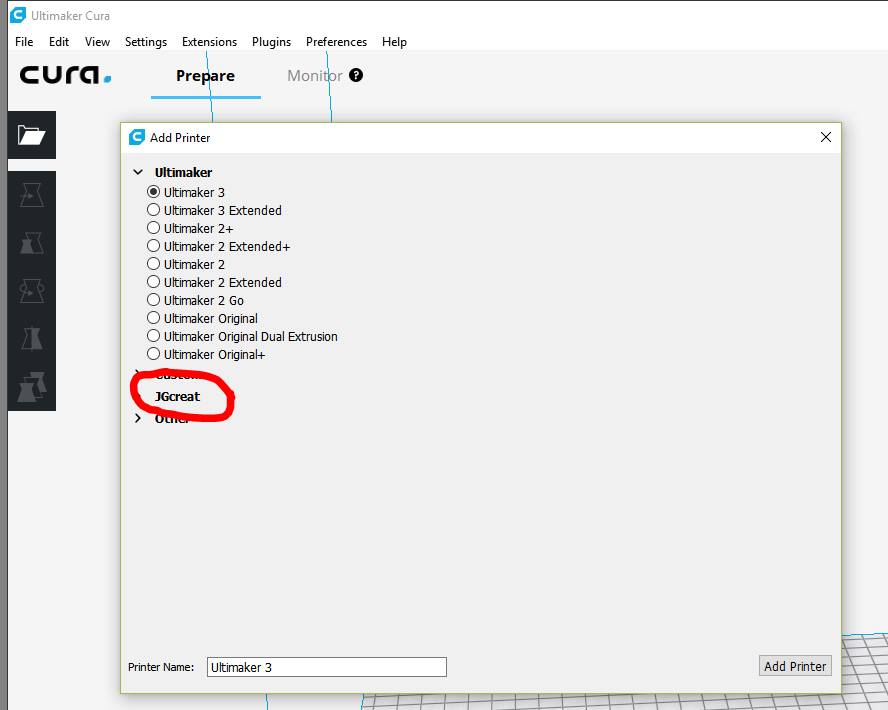
- Start Cura up and click settings –> printer –> add printer
- Choose your JGAurora printer from the menu (should look like image below - click to enlarge).
- Easy
Thanks to Steve Wagg for this tip!
Starting & Ending GCode
You will notice two text boxes in the machine settings. These contain GCode commands that are run at the very start and end of the print. See this article on starting and ending GCode for more information.
Printing Profiles
The default printing material settings in Cura can be reasonably successful when used on the A5, but there are a few essential settings you will need to change:
Essential Settings
- Change filament diameter to 1.75mm
- Set first layer printing speed to 10-15mm/s
- Set PLA temp to 210ºC to start with, or ABS to 240ºC.
- Set Bed to 65ºC for PLA, and to 110ºC for ABS.
Bed Adhesion
To improve bed adhesion, you may want to turn on the “brim” option, with 10-15 lines. This will help to keep the part stuck down during printing. Also, make sure your bed is level!
Retraction Settings
The A5 and A3S are bowden extruders. This means that there is a degree of elastic compression to the filament in the tube between the extruder motor, and the hot end nozzle. This increase the likelyhood of oozing filament, so to combat this the first change you want to do is to increase retraction to between 6.5 and 8mm, and increase the retraction speed to between 75 and 150mm/s.
Skin / Shell / Outer layer speed
These printers are metal, but they are thin metal, and are quite tall and spindly. For this reason, fast printing can introduce vibrations that will reduce the quality of fine details. You can get better quality, by reducing the speed of outer layers, also known as skins or shell speeds. Less than 35mm/s is recommended for high quality prints.
Other Slicers & Printing Profiles
The settings above will largely work in many other slicers as well, but the options may be labelled differently. Some suggested settings from other community members can be found in the links below.
More material printing profiles can be downloaded here. Source: Charles Eakins @ https://github.com/ceakins/3d-Printer-Profiles/tree/master/cura
IdeaMaker
You can setup IdeaMaker with the A5 printer, by using these machine settings here. More printing settings can be downloaded here. Source: Charles Eakins @ https://github.com/ceakins/3d-Printer-Profiles/tree/master/ideaMaker
Simplify3D
Simplify3D is perhaps one of the best paid slicers out there, i would recommend setting your machine up yourself to learn the software, but if you want to just get printing, grab my FFF profiles from the link below. FFF Profiles Link. Source: Cs2000


