
This is an old revision of the document!
Developer Information for A5S & A1 Custom Firmware
This document provides more detailed developer info on the custom firmware, as well as info on how to setup a build environment and build your own version of the firmware from scratch. Due to compiler differences resulting on error message on mac, these instructions are currently PC only.
A5S & A1: Printer Firmware Differences
The A5S and A1 are powered by the same motherboard. The only difference between these printers, is that the x-axis is reversed on the A1, so the motor directions must be changed. This also means that homing occurs to X-max, rather than the traditional X-min. The only other differences are minor geometry changes since the A5S and A1 differ in build volume.
Step 1. Download a copy of the firmware files
You can either clone or download a copy of all the files from github here using the green button here.
Step 2. Configure your files for the correct printer.
These differences are all contained within the main configuration.h files for these printers. To configure the build for the correct printer, the correct configuration files can be copied from the config/examples/JGAurora directory, into the main /Marlin/Marlin/ folder, to be placed alongside Marlin.h.
Step 3. Install a platformio-compatible code editor of your choice.
You have two options for supported code editors, you can use VSCode from Microsoft (recommended), or you can use Atom.
Step 4. Install Platformio
Install instructions for Platformio are here.
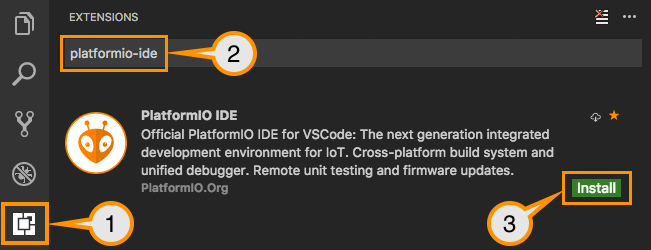
NOTE: Installing takes some time, and happens in the background. You may want to leave this running for an hour to fully setup. If you find your projects don't compile, and seem to be frozen, don't worry, PlatformIO probably hasn't finished fully installing all the internal components.
Step 5. Setup Workspace
Add the entire Marlin root folder to your workspace in Platformio.

Step 6. Build Project
Click the build button in the toolbar, like shown below. Platformio will download the correct packages and libraries for the firmware, so this may take some time.

Step 7. Install Firmware
The compiled firmware files will be found in the main folder, located in an invisible folder under /Marlin/.pioenvs/jgaurora_ax/
There will be two files:
- firmware_with_bootloader.bin
- firmware_for_sd_upload.bin.
The file with bootloader is to be used if flashing a blank motherboard, as it includes the bootloader that is responsible for handling the SD card upload process. This means there is nothing to worry about if you want to experiment with creating your own firmware without the bootloader, as you can reinstall it later on. To flash the full firmware you will need a SWD programmer (a ST-link clone off ebay costs $5 or less).
If you don't have a programmer device available, then you will have to flash using the SD card method:
- Place the bin “firmware_for_sd_upload.bin” onto the SD card.
- Turn off the printer, and unplug it from the wall.
- Wait 30 seconds.
- Insert the SD card.
- Plug in and turn on the printer. Flashing will occur automatically.
Flashing via SD card doesn't change the bootloader at all, so going back to factory firmware is simply following the instructions above, using the OEM firmware files linked to here.
