This is an old revision of the document!
Table of Contents
Tuning & Upgrading the Stepper Drivers
The A5 and A3S printers use a MKS GEN L motherboard, which features replaceable standard “stepstick” format stepper drivers. These small modules can be replaced with better quality drivers if desired, or simply swapped out if they are damaged.
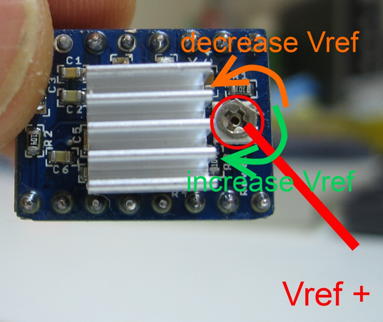
The stepper drivers must be set to the correct power level, to ensure the right amount of power is provided for the motor size being used. On each stepper driver, there is a small variable potentiometer (resistor) that sets a reference voltage to tell the driver how much current to deliver to the motor. This potentiometer can be turned with a small screwdriver.

The reference voltage, or VREF, can be measured with a multimeter from the metal potentiometer top, to a ground point on the motherboard. The maximum VREF that a stepper driver is rated for, is typically determined when using a heatsink that is cooled by a fan. In the JGAurora A5 and A3S, there is no internal active cooling inside the main chassis, so care must be taken to avoid the drivers overheating. When stepper drivers overheat, they are not usually damaged, but they will auto-shut down until their temperature drops back down to a suitable working level.
Different models of stepper driver, have different maximum current ratings. To work out the current output, each stepper driver also has a specific formula that allows the output current to be calculated from the reference voltage.
How-to tune your stepper drivers
- Raise the z-axis high, so it is out of the way.
- Unplug the AC mains cable. it is not needed for tuning the stock stepper drivers. Note: For the TMC2XXX drivers, the power supply must be ON for tuning - so be EXTREMELY careful. I suggest unplugging power while disassembling the printer, and then only plugging power back in when actually performing the tuning process.
- Open the chassis (3 screws at the back, 4 screws at the front.)
- Prop the chassis open, or disconnect things until you have access to the stepper drivers.
- Plug the main motherboard into a USB power source, like a computer or a USB power bank.
- Turn your multimeter to voltage measuring mode. Ensure the red lead is plugged into the socket marked “V” for volts (voltage) and not “A” for amps (current)
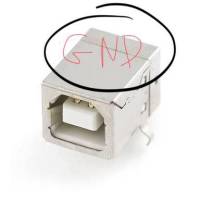
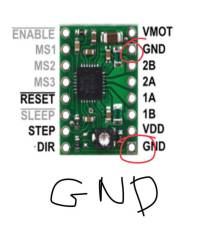
- Find a source for ground. The usb plug is easy to access. Touch the ground point with the black lead.
- Touch the Stepper Driver potentiometer with the red probe. Be very careful NOT to touch anything else - you can easily short circuit and damage the driver if you slip!!
- The multimeter should indicate the stepper driver reference voltage. Good VREF values for the various axis on the A5/A3S printers are listed below.
- Remove the multimeter, and turn the potentiometer slightly, ideally with a ceramic screwdriver. A metal screwdriver can be used if you are very careful.
- Re-measure the stepper driver reference voltage
- Repeat the last two steps, until the correct VRef is set for each axis.
| Example of Ground (GND) point: |   |
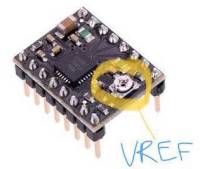
| Example of VRef measuring points: |  |
Tuning the Stock A4988 Stepper Driver Vref
The voltages below are recommended for stock A4988 stepper drivers only:
- Axis = Vref
- X = 0.4 - 0.55V
- Y = 0.4 - 0.6V
- Z = 0.7 - 0.85V
- E = 0.55 - 0.6V
How to Upgrade Stepper Drivers to TMC2XXX (TMC2100, TMC2130, TMC2208)
There are two excellent videos by Da Hai Zhu on how to upgrade stepper drivers to TMC2130, both in Standalone and SPI mode
- Watch Part 1 Here: Basic Installation of TMC2130
- Watch Part 2 Here: Setting up SPI mode.
Tuning TMC2XXX Stepper Drivers
The motor current must be sufficient to prevent stalling, but too high a current can cause the TMC2XXX to shut down due to overheating. Cooling of the TMC2XXX stepper drivers with a fan is ESSENTIAL for reliable operation. They may be quiet, but they are certainly run hot!
Manual Current Setting via Vref
The voltages below are suggested for stock A4988 stepper drivers only:
- Axis = Vref
- X = 0.8V
- Y = 1.4V
- Z = 0.8V
- E = 1V
IMPORTANT POINTS:
- When measuring Vref on the TMC2XXX, you need to measure the voltage from the Vref hole (marked on the stepper board) to ground, and NOT from the top of the poteniometer.
- Unlike the A4988 stock drivers, the printer power supply must be ON to tune the TMC2XXX stepper drivers.
The TMC2XXX stepper drivers have an internal 5 volt voltage regulator that generates their 5V reference voltage from the motor supply voltage (24V). Therefore, the reference voltage can only be set when the 3D Printer is powered on, so that the 24 volt power is available.
The 5V reference voltage is compared to the voltage output of the trimpot (mini-potentiometer) which is used to set the maximum motor current.
Digital Current Setting
If you have the TMC2130 chip, and have wired it for SPI communication (and same with the TMC2208 via UART), you can control the motor current digitally through gcode commands. However, the maximum motor current is still limited by the potentiometer, so make sure you have that turned up sufficiently, before you try using digital control. See this page for more information.
TMC 2208 How to set the stepper motor current? Here is an online calculator for the TMC 2208 Stepper Drivers: https://learn.watterott.com/silentstepstick/faq/ Here is a video how to install the TMC2208 to the MKS_GEN_L Mainboard for the purpose of noise reduction: https://www.youtube.com/watch?v=U7JhtnU8zlw
TODO: Work in progress ....
TODO - good discussion here regarding appropriate vref.
Good info on tune vref for tmc2130 on the voron page here
Several different of stepper drivers are [TODO…]
Types
A4988, DRV8825, TMC21XX, TMC2208, THB8128, others
Pros/Cons
Tuning stepper driver current, Vref etc
Microstepping & jumpers
Changing firmware steps/mm, changing active high/low
TL Smoother & Salmon Skin


