
This is an old revision of the document!
Table of Contents
Under Construction
Automatic Control The Cold End Fan
Author: AETEK
The changes shown here require knowledge in the field of Arduino IDE, Marlin and electrical engineering and can overwhelm normal users. Also, I would like to point out possible dangers that exist in certain interventions. All adjustments have been checked for function.
Difficulty: Advanced
What is this about?
https://en.wikipedia.org/wiki/Pulse-width_modulation
PWM (Pulse-width-modulation) is a technique to control the performance of e.g. a fan (as in the A5).
Just as the A5 is delivered from the factory, only the component cooler (A5 lower fan) is PWM controlled. The Cold End Fan (A5 upper fan) is directly connected to 24V and constantly makes annoying sounds. I will show how to automatic control the Cold End Fan (A5 upper fan) via PWM and thus gets quieter. Thanks to the PWM control, the Cold End fan runs slower and also temperature-controlled. The Marlin firmware only turns on the fan when needed. When the hot end has cooled to 50°C, the cold end fan will shut down. As a result, the upper A5-fan gets noticable quieter. Unfortunately, there is a side effect. Due to the fan control with PWM, the fan generates additional PWM noise. To achieve the maximum noise reduction, it is necessary to add my PWM filter. The mentioned hardware-optimizations can be combined in one adapter cable.
Note:
If you opt for this optimization, then always do both the hardware,
as well as the software conversion. Otherwise, the hot end cooling system will stop working.
Required Electrical Parts
- 1 x Diode 1N 4007
- 1 x Resistor 100 Ohms 3 Watts
- 1 x Electrolytic Capacitor 220uF 35V
- 1 x 2-Pin male plug for building a plug-in-adapter.
- Some cable and heat shrink
The hobbyist will most likely have the parts in the tinker box.
Build The Circuit

Please note the polarity


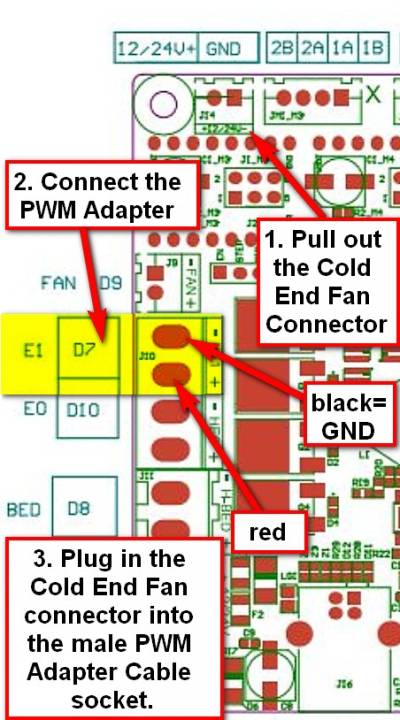
Connection On MKS GEN_L Mainboard
 Please note the polarity


Please note the polarity

This concludes work on the A5 hardware for this project. In order for the cooling system to work, the Marlin firmware has to be adjusted.
Customize the Marlin firmware
In the Arduino IDE open the A5 Custom Community Firmware (see article here in WIKI).
The following adjustments are made in the “Configuration_adv.h” file:
Search for: Extruder cooling fans
Replace this original code block…
#define E0_AUTO_FAN_PIN -1
#define E1_AUTO_FAN_PIN -1
#define E2_AUTO_FAN_PIN -1
#define E3_AUTO_FAN_PIN -1
#define E4_AUTO_FAN_PIN -1
#define EXTRUDER_AUTO_FAN_TEMPERATURE 50
#define EXTRUDER_AUTO_FAN_SPEED   255  // == full speed
…with this customized code:
#define E0_AUTO_FAN_PIN 7
#define E1_AUTO_FAN_PIN 7
#define E2_AUTO_FAN_PIN -1
#define E3_AUTO_FAN_PIN -1
#define E4_AUTO_FAN_PIN -1
#define EXTRUDER_AUTO_FAN_TEMPERATURE 50 // Switch on Coolend Fan(s) if Temp is >=50C
#define EXTRUDER_AUTO_FAN_SPEED   150    // Select Fan Speed. Range 0...255 (128= Half speed, 255=Full speed)
The 30mm fans used by JGAURORA have the ability to run slowly and to develop the full speed after an operating time of about one minute. This must be taken into account when choosing the fan speed. If, after the modification, you get problems with a clogged nozzle, then the value must be increased to provide more cooling power.
The speed of the cold end fan (A5 upper fan) is determined in the line
#define EXTRUDER_AUTO_FAN_SPEED 150
For me, the default value of 150 works without problems. That's a good compromise between cooling performance and noise.
Then upload the changed firmware to the A5 (instructions here in the WIKI).
Do the second test
For this test, the A5 does not need to be assembled. It can stay open.
Please place the provisional circuit outside the metal chasis (see photo) to avoid short circuits.
- Insert mains plug.
- Power on the printer and wait 10 seconds.
- The red LED of the test circuit should light up and stay on.
- Now power off the printer and unplug the power cord.
Status 6. July 2018: Unfinished! More Content coming soon…
