This is an old revision of the document!
Table of Contents
Mesh Bed Levelling
Mesh bed levelling allows you to level the bed at as many points as you would like to, in a grid. This allows you to get perfect first layer height anywhere on the large bed - and it does not matter if it is warped or not!
DaHai has an excellent video on how to setup and perform mesh bed levelling on the A5, on his Youtube channel.
Before Performing Mesh Bed Levelling
Firstly: This is a very repetitive process. But you need to focus, as if you mess up, you will need to start from the beginning. Make sure you are in a good mood, and are happy to be patient and persevere - the results will be worth it! :)
Before you can use this feature, you will first need to install the custom firmware. Once you have done that, you are ready to proceed.
Next, perform the following steps:
- Download and install Pronterface.
- Open pronterface, and plug your printer into your computer via USB
- Connect to the printer using baud-rate 250000, and using the correct Serial/COM port for your printer.
- Pre-heat the bed to the printing temperature you normally use.
- The bed will warp depending on temperature, so let the printer “heat soak” for a few minutes or so, so that the bed is stable and will not change in shape any further.
FAQ: What is GCode?
Gcode is just the language for the instructions that the printer follows to perform a print. Cura or your slicer, simply translates the STL file into the GCode that the printer run on. Pronterface allows us a way to send individual GCode commands one by one, and this is the way we can communicate to the printer, and perform procedures like this one.
How To Perform Mesh Bed Levelling
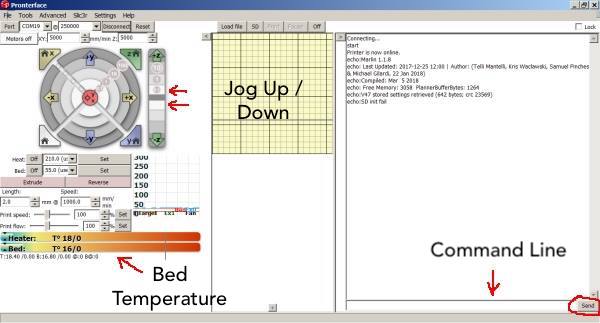
We will be entering commands into the GCode command line, in pronterface.
 Image Credit: Stephen Todd via Facebook Group
Step 1. Enter command “G29 S1” into the command line, and press enter. This will start the mesh bed levelling routine.
Step 2. Place a sheet of paper (normal printer paper) under the nozzle.
Step 3. Use the fine-movement jog controls in pronterface to move the nozzle up and down, until the nozzle is just starting to grab at the paper. You should still be able to move the paper around, but there should be a small amount of friction or drag from the nozzle.
Step 4. Enter command “G29 S2” into the command line, and press enter. This will save that height for that point, and nozzle will move to the next point.
Step 5. Repeat steps 3 and 4, until the process is completed. Make sure you enter “G29 S2” after the final point.
Step 6. Enter command “M500” to save the mesh into the EEPROM memory of the firmware.
After Performing Mesh Bed Levelling
Once you have performed the mesh level, and stored it to EEPROM, you now need to tell your slicer to USE this feature. You need to add the gcode “M420 S1” into your start gcode section in your slicer. This needs to go RIGHT AFTER the G28 homing command, in order to enable the mesh correction before printing starts. The G28 command for homing will DISABLE the mesh bed levelling, so it is important that you give this command right after it.
If you want to check the mesh that you have produced, you can use the command “G29 S0” to print a mesh report to the command line history window.
More Info
For more information on the mesh bed levelling process and options, please see the Marlin Firmware Documentation on Mesh Bed Levelling.


